What We’re Building
Connect your home pfSense firewall to Microsoft Azure cloud using a secure VPN tunnel. This creates a “hybrid network” where your home and cloud act like one big private network.
Azure Terms You Need to Know
Core Networking Terms
- Virtual Network (VNet): Your private network space in Azure (like your home LAN, but in the cloud)
- Subnet: Smaller networks within your VNet (like VLANs on your pfSense)
- Resource Group: A folder that holds related Azure resources together
- Region: Physical Azure data center location (East US, West Europe, etc.)
VPN-Specific Terms
- VPN Gateway: Azure’s VPN endpoint that talks to your pfSense
- Local Network Gateway: Azure’s representation of your home network
- Connection: The configuration that links Azure Gateway to Local Network Gateway
- Site-to-Site (S2S): VPN type that connects two networks (not individual devices)
Security & Crypto Terms
- IPSec: Industry standard VPN protocol for secure tunnels
- IKE (Internet Key Exchange): Protocol that sets up the VPN tunnel
- Phase 1: Establishes secure channel between gateways
- Phase 2: Creates the actual data tunnel
- PSK (Pre-Shared Key): Password both sides use to authenticate
- Encryption Algorithm: How data is scrambled (AES-256)
- Hash Algorithm: How data integrity is verified (SHA256)
- DH Group: Method for secure key exchange
Step-by-Step Setup
Prerequisites
✅ Azure subscription with credits
✅ pfSense firewall with public IP or DDNS
✅ Non-overlapping networks (Azure and home use different IP ranges)
Phase 1: Create Azure Infrastructure
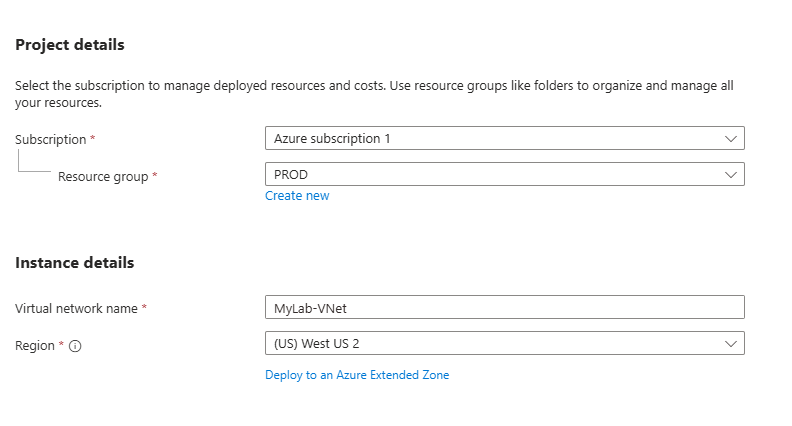
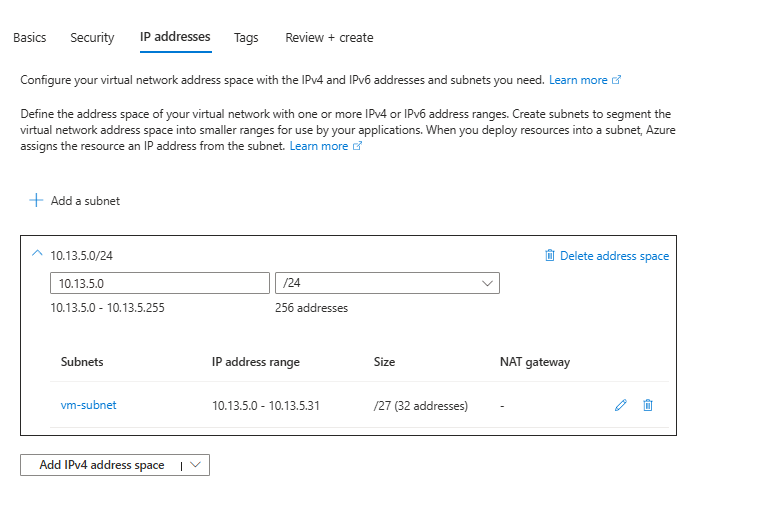
Step 1: Create Virtual Network with Both Subnets
Portal Search: "Virtual networks"
→ + Create
→ Name: MyLab-VNet
→ Region: East US (or closest to you)
→ Address space: 10.13.5.0/24
→ Subnet name: vm-subnet
→ Subnet range: 10.13.5.0/27
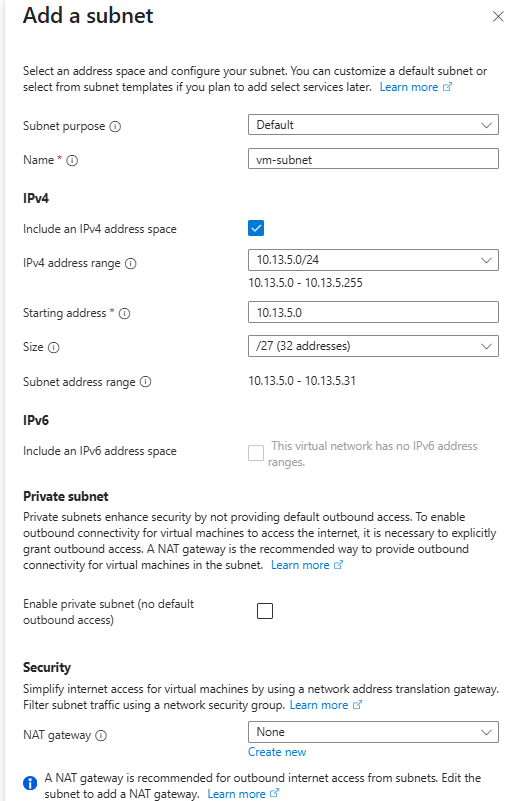
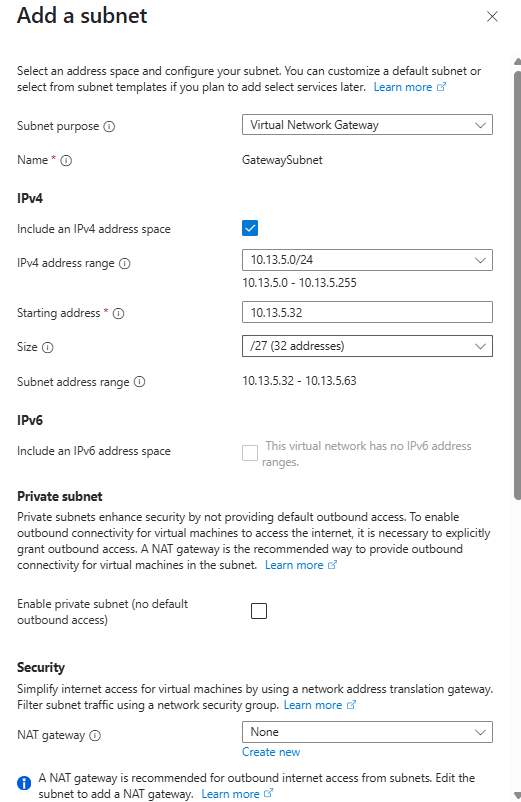
→ IP addresses tab → + Add a subnet
→ Subnet purpose: Virtual Network Gateway
→ Name: GatewaySubnet (auto-fills)
→ Address range: 10.13.5.32/27
→ Review + create → Create
Why this matters: This creates your “cloud LAN” with both required subnets in one step. More efficient than creating them separately!
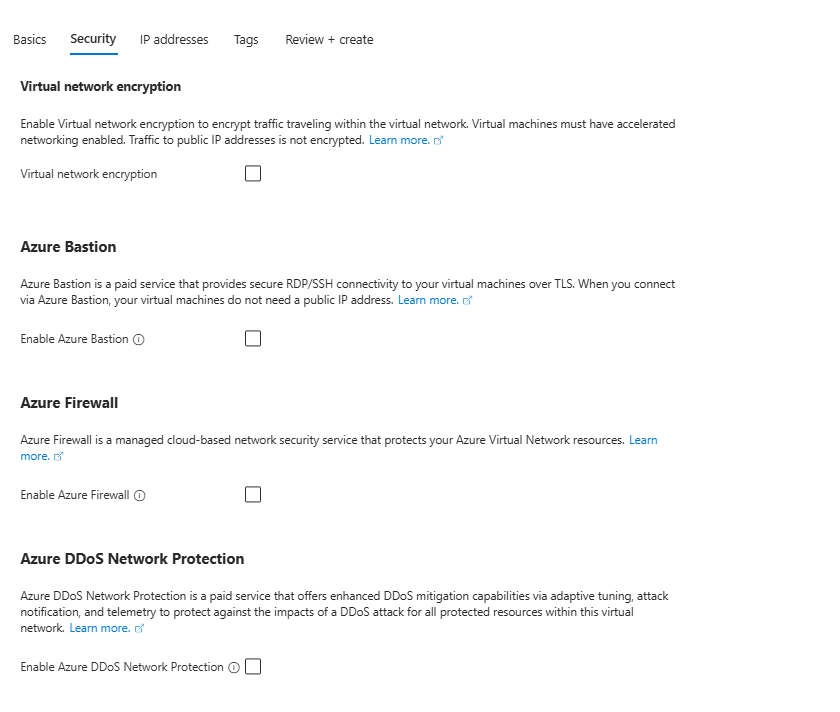
You don’t need to set up additional security features like Virtual Network Encryption, Azure Bastion, Azure Firewall, or Azure DDoS Network Protection. The IPSec tunnel already provides secure encryption for your Site-to-Site VPN connection.
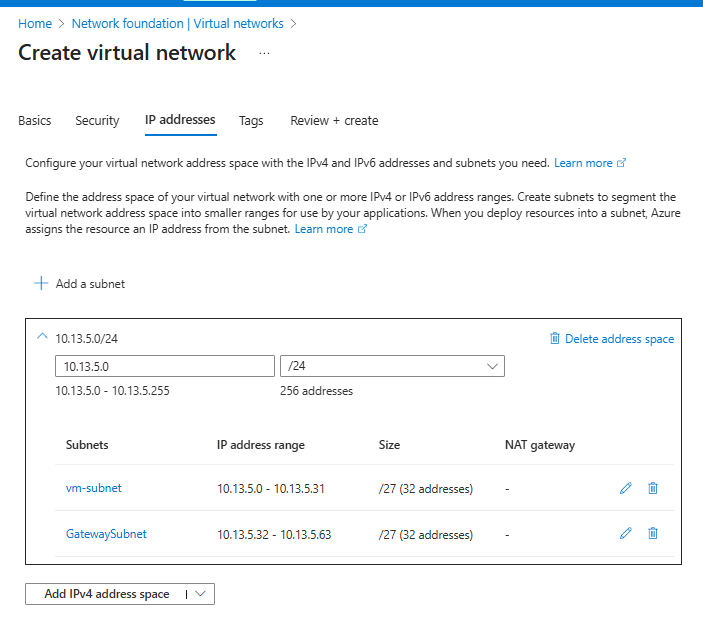
Step 2: Verify Your Network Setup
Go to Virtual networks → MyLab-VNet → Subnets
→ Confirm you see both:
  - vm-subnet: 10.13.5.0/27
  - GatewaySubnet: 10.13.5.32/27
You’re ready for VPN Gateway creation! Both required subnets are now in place.
Best Practices for Subnet Ordering:
Option 1: Infrastructure First (Recommended)
10.13.5.0/24 Network:
├── GatewaySubnet: 10.13.5.0/27   (10.13.5.0 - 10.13.5.31)
└── vm-subnet: 10.13.5.32/27      (10.13.5.32 - 10.13.5.63)
Option 2: Current Setup (Also Fine)
10.13.5.0/24 Network:
├── vm-subnet: 10.13.5.0/27 (10.13.5.0 - 10.13.5.31)
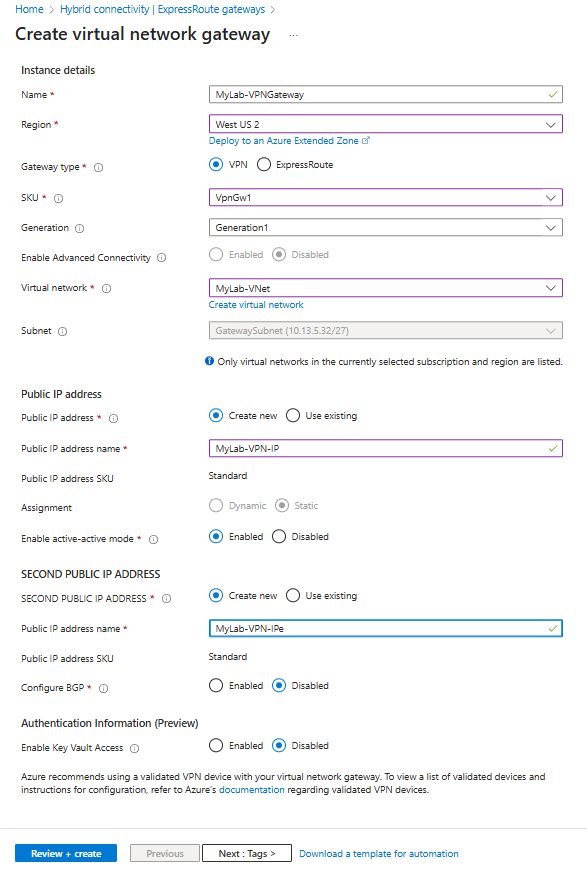
└── GatewaySubnet: 10.13.5.32/27 (10.13.5.32 - 10.13.5.63)Step 3: Create VPN Gateway
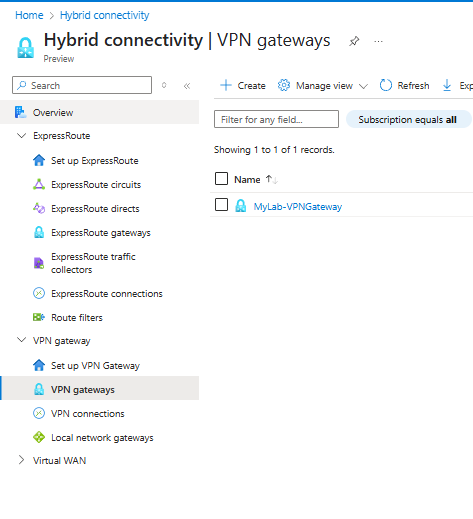
Portal Search: "Virtual network gateways"
→ + Create
→ Name: MyLab-VPNGateway
→ Region: East US (MUST match your VNet region!)
→ Gateway type: VPN
→ VPN type: Route-based
→ SKU: VpnGw1 (cheapest with portal support)
→ Virtual network: MyLab-VNet (should appear after correct region)
→ Public IP: Create new → Name: MyLab-VPN-IP
→ Create
⚠️ CRITICAL: Make sure the Region matches exactly where you created your Virtual Network! If your VNet doesn’t appear in the dropdown, you have a region mismatch.
Wait time: 20-45 minutes ☕
Why this matters: This is Azure’s VPN endpoint – the “other end” of your tunnel. Notice that you don’t select the GatewaySubnet here – Azure automatically uses it once it exists in your VNet. Without the GatewaySubnet from Step 2, this creation will fail.
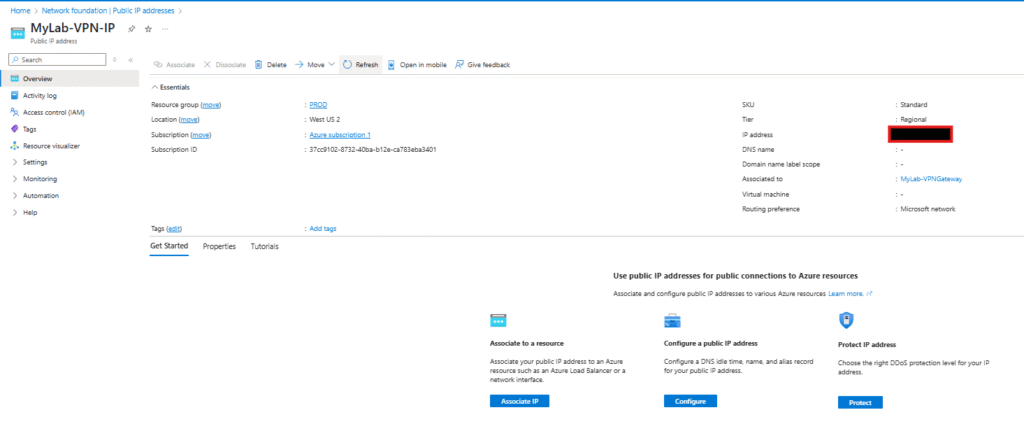
Step 4: Get Your Azure IP Address
Portal Search: "Public IP addresses"
→ Click "MyLab-VPN-IP"
→ Copy the IP address (e.g., 203.0.113.45)
Save this IP – you’ll need it for pfSense configuration!
Phase 2: Tell Azure About Your Network
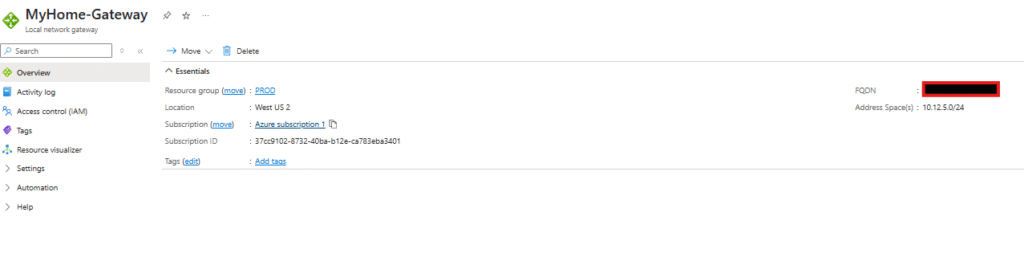
Step 5: Create Local Network Gateway
Portal Search: "Local network gateways"
→ + Create
→ Name: MyHome-Gateway
→ Endpoint: FQDN (if using DDNS) or IP address
→ FQDN/IP: your-home.ddns.net or your public IP
→ Address space: 192.168.1.0/24 (your home network)
→ Create
Why this matters: This tells Azure “there’s a network at this address that I want to connect to.”
Step 6: Create the Connection
Go to Virtual network gateways → MyLab-VPNGateway
→ Connections → + Add
→ Name: Home-to-Azure
→ Connection type: Site-to-site (IPSec)
→ Local network gateway: MyHome-Gateway
→ Shared key: Create strong password (write it down!)
→ OK
Critical: The shared key must be used in pfSense too!
Phase 3: Configure pfSense Side
Step 7: pfSense Phase 1 Configuration
pfSense Web UI: VPN → IPSec
→ + Add P1
→ Remote Gateway: [Azure IP from Step 4]
→ Authentication Method: Mutual PSK
→ Pre-Shared Key: [Same password from Step 6]
→ Encryption Algorithm: AES (256 bits)
→ Hash Algorithm: SHA256
→ DH Group: 2 (1024 bit)  ← IMPORTANT for Azure Basic!
→ Save
Why DH Group 2: Azure Basic SKU is picky about crypto – Group 2 works best.
Step 8: pfSense Phase 2 Configuration
Show Phase 2 Entries → + Add P2
→ Local Network: 192.168.1.0/24 (your home network)
→ Remote Network: 10.13.5.0/24 (Azure VNet)
→ Encryption: AES (256 bits)
→ Hash: SHA256
→ PFS Group: 2 (1024 bit)
→ Save → Apply Changes
Step 9: pfSense Firewall Rules
Firewall → Rules → IPSec tab
→ + Add
→ Protocol: Any
→ Source: Any
→ Destination: Any
→ Save → Apply Changes
Why open rules: For initial testing – tighten security later.
Phase 4: Verify Connection
Step 10: Check Azure Status
Azure Portal: Virtual network gateways → MyLab-VPNGateway
→ Connections
→ Status should show: "Connected" ✅
Step 11: Check pfSense Status
pfSense: Status → IPSec
→ Should show tunnel status as "Established" ✅
Step 12: Test Connectivity
From home network device:
ping 10.13.5.1  (try to reach Azure)

From Azure VM (if you have one):
ping 192.168.1.1  (try to reach your home)
Common Issues & Solutions
“NO_PROPOSAL_CHOSEN” Error
Problem: Crypto algorithm mismatch
Solution: Use DH Group 2 (1024 bit) in pfSense Phase 1
VPN Gateway Deployment Failed
Problem: Most commonly caused by missing or incorrectly named Gateway Subnet.
Solution:
- Verify you have a subnet named exactly “GatewaySubnet” (case-sensitive)
- Ensure it’s at least /29 size (8 IP addresses minimum)
- Delete failed gateway and recreate after fixing subnet
- Try different region if capacity issues persist# Simple Azure to pfSense VPN Setup Guide
Connection Shows “Connecting” Forever
Problem: Shared key mismatch
Solution: Verify exact same password in both Azure and pfSense
Tunnel Up But No Traffic Flow
Problem: Firewall blocking or wrong subnets
Solution: Check pfSense firewall rules and verify network ranges
Azure Gateway Deployment Failed
Problem: Region capacity or SKU issues
Solution: Try different region or restart deployment
Cost Breakdown
| Component | Monthly Cost | Notes |
|---|---|---|
| Virtual Network | Free | Always free |
| VPN Gateway (VpnGw1) | ~$140 | Main cost component |
| Public IP | Free | First static IP included |
| Data Transfer | $0-5 | First 5GB free monthly |
| Total | ~$140-145 | For learning/lab use |
Budget tip: Use Basic SKU (~$30/month) if you can configure via CLI instead of portal.
Azure Architecture Diagram
Internet
    │
    ├─ Your Home Network (192.168.1.0/24)
    │   └─ pfSense Firewall
    │       └─ IPSec Tunnel ═══════════════════╗
    │                                          ║
    └─ Azure Cloud                             ║
        └─ MyLab-VNet (10.13.5.0/24)          ║
            ├─ default subnet (10.13.5.0/27)  ║
            └─ GatewaySubnet (10.13.5.32/27)  ║
                └─ VPN Gateway ═══════════════╝
                    └─ Public IP: 203.0.113.45
What You’ve Accomplished
✅ Hybrid Cloud Network: Home and Azure are now connected
✅ Secure Communication: All traffic encrypted with IPSec
✅ Scalable Foundation: Ready to add VMs, databases, services
✅ Cost-Effective: Optimized for learning and lab use
✅ Production Ready: Can scale up for business use
Next Steps
- Add Azure VMs in your VNet to test connectivity
- Implement monitoring and alerting for the VPN
- Tighten security with specific firewall rules
- Add services like databases accessible through VPN
- Document configuration for future reference
Key Takeaways
Azure Concepts Learned
- Resource organization with Resource Groups and regions
- Network segmentation with VNets and subnets
- Gateway architecture for hybrid connectivity
- Cost management and SKU selection
Networking Skills Gained
- IPSec VPN configuration and troubleshooting
- Crypto algorithm selection and compatibility
- Route-based VPN concepts and benefits
- Hybrid network design principles
pfSense Integration
- Azure-specific settings for reliable connection
- Phase 1/2 configuration best practices
- Firewall rule management for VPN traffic
- Troubleshooting methodologies for VPN issues
Congratulations! You’ve successfully created a professional-grade site-to-site VPN connection between your home lab and Microsoft Azure. This foundation enables countless possibilities for hybrid cloud applications, backup solutions, development environments, and learning opportunities.
This setup demonstrates real-world cloud networking skills that are highly valued in IT careers.
Leave a Reply